
Technical & Installation Resources


In this section you will find many helpful hints and guidelines to use when measuring and installing Tara pool liners and safety covers. Many common questions can be answered here about such things as squaring corners, measuring steps, and measuring Roman end pools. If you have further questions, contact our customer service team.

The Tara Tab System for Vinyl Liner Installation


What is a Tab?

If you’ve ever looked at a Tara vinyl liner box, you may have noticed the pool shapes printed on the top. These drawings show where the "tabs" are located. The tabs are an indicator Tara has used for years to help pool professionals quickly position a liner in a pool. If you place the liner tabs in the location indicated on the top of the box, the rest of the liner will be easy to position. Using the tabs takes much of the guess work out of installation.

The tab is a triangular shaped flap or tab of material that is added to the liner drawing when it is set up in Auto-cad. When that piece of the liner is cut, the tab looks like an extra "V" shaped bump. As all of the pieces of the liner are welded together, the tabs are left loose on the back side of the liner. They do not interfere with the appearance or performance of the liner. Simple and effective, our liner tabs are an incredibly accurate liner positioning system.

Easy to find

Tabs are placed at the two most strategic points for quickly positioning a pool liner. Located in the shallow end, they are easy to find on the back-side of the liner. On most pool shapes they are in the shallow end corners where the wall and floor meet. On pools without corners such as ovals, kidneys and free-form pools the tabs are either in the center of the radius or at the break. The easiest way to find and position them properly is to check the top of the box. Because the box is always there when the liner is installed, it is the best place to give installers a quick reference for the tab locations.

Easy to use

A Tara vinyl liner is always folded with the shallow end on top because that is the end you will start in. The top of the box indicates which direction the liner will unfold. Unfold it towards the shallow end and quickly find the tabs. The tabs are placed in the shallow end where the liner is easiest work with. After you find the triangular shaped tab on the back of the liner (The box top will tell you where to look), place the tab in the position point shown on the box. Once both tabs are in position, the liner is aligned and ready to hang in the bead track.

Tara's Tabs vs. other methods

Other manufacturers have methods to indicate position points on the liner. They place marks or stickers at the top of the wall. This method is not as accurate as the method Tara uses. The top of the wall can be "off" from the floor in a number of ways. To fit properly the pool liner must fit the bottom of the pool. Tara places the tabs on the bottom of the pool. Tara's system also eliminates any human error that can occur, by incorporating the tab into the liner design. Once you use our liner tabs you'll realize why it is the easiest and most effective system in the market.

General A-B Point-to-Point Set-up


Establishing A-B Points

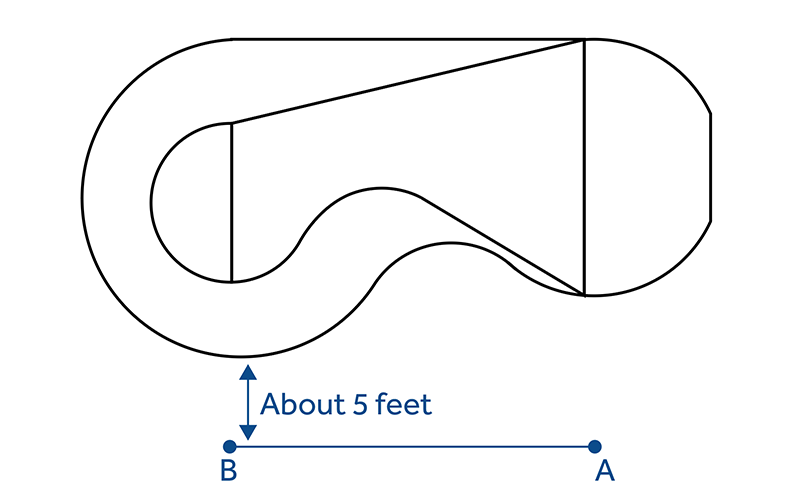
The first thing to be done is establish two points, an A point and a B point approximately 5' from the edge of the pool. The points should be roughly 2/3 of the length of the pool apart. If, for example, your pool is 40' long your distance between A and B should be about 26' apart. The points should be on a flat surface.

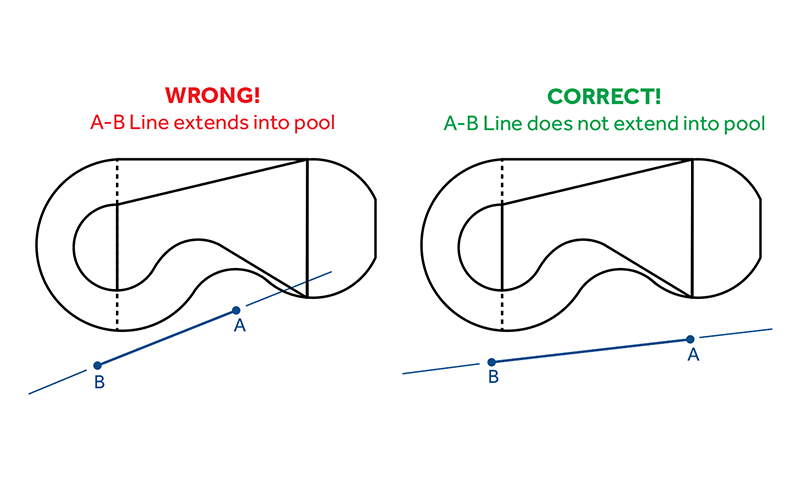
Your A and B points if extended with an imaginary line from both ends should not cross the pool at any point. If this line does cross the pool you will have to adjust your points.

Marking A-B Points

To establish your perimeter points mark the points approximately 2' apart along the coping. The distance between points can vary. If you are marking points around a sharp radius you want to mark the points closer. If you are marking points along a straight section you can mark them further apart.

It is important that you mark transition points where a radius starts or ends and also where two straight sections come together at an angle. If your pool has a step or a step cut you need to mark where the step starts and ends.

To help establish the bottom dimensions you need to extend a line across the shallow end break and also across the hopper break line. Mark these points where they meet with the perimeter. One of the shallow end points should be used as point number 1. Label which points mark the other break points on your order form. The remainder of your points should be numbered sequentially starting at point number 1.

Measuring A-B Points

When measuring your points, it is important to make sure that you measure in a straight line. Do not bend the tape measure around objects. Make sure that the tape measure is pulled tight. You can round your measurements to the nearest inch.

Measure from point A to all points on the perimeter and then from point B to all points on the perimeter. You will also need to find the overall length and width of the pool. To do this you will need to pick a point in the shallow end and a point in the deep end. Select points that will best approximate the overall length of the pool. Note which points were used and what the measurement was. Use the same method to find the overall width of the shallow end and deep end.

It is best to leave your points including the A and B points until the liner is installed. That way if there are questions or problems we can refer back to the original points.


Measuring bottom dimensions

To help establish bottom dimensions, make sure to mark points where the break begins and ends. When measuring the back and side slopes use a point to measure from. Note which point was used and measure straight out from that point. Take depth measurements at the back of the hopper where the back wall starts and the sides of the hopper where the side walls start. Measure the depth of the shallow end and note if there is a cove or if the shallow end is not flat.


Measuring Steps

  • Always indicate what the corner type is on the back of the step (90 degree, radius, diagonal).
  • Risers should equal shallow end wall depth.
  • Measurements must be very precise.
  • Always drain pool and cut out old liner to measure steps.
  • If you are going to cover the step with foam we must know the thickness of the foam.
  • If there is a setback indicate the type and size.

Squaring Corners

When measuring a pool it is helpful to "square up" radius or grecian (diagonal) corners. This becomes crucial when measuring True-L or Lazy-L pools, or when taking diagonal measurements. By squaring up the corners, you accomplish four things:

  • You have a common point of reference for length, width, and diagonal measurements.
  • By examining the completed pool measurements you can quickly determine if the pool is actually square.
  • If the pool is square you can accurately determine the corner size.
  • It is much easier for us to reconstruct the measurements into a precise pool shape.

To square up a corner you need to extend the straight wall past the corner by snapping a chalk line. You need to do the same with the other straight wall that makes up the corner. Make sure to line up the string for the chalk line with the bead track. Do not line it up with the edge of the coping since the bead track is not right on the edge. Where your two chalk lines intersect should be used as your point of reference for measuring.


Measuring Roman End Pools

Roman End pools require more measurements than an ordinary rectangular pool. This involves measurements for both radius ends, all corner sections straight walls and hopper dimensions. See illustration 1 for perimeter measurements that should be taken.

On most Roman End pools with oval shaped hoppers additional measurements are needed. If there is a straight section on either side of the hopper we need to know what the straight section measures.